crafting an artdoll

BRAMBLING 🌲| Making a Fantasy Art Doll

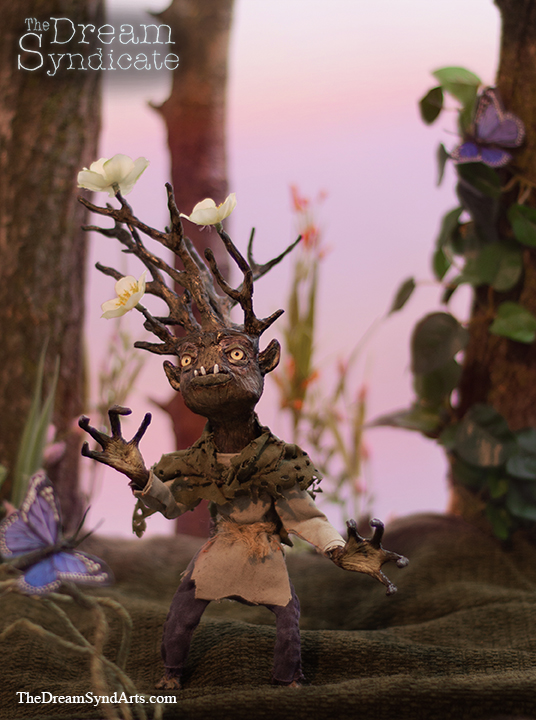
And finally, a brambling is full born... or is it sprouted from a little acorn? The biology of the little fae creatures aside, this fantasy art doll is completed! All told, he probably took around 16 hours to craft (including accidentally sculpting two right hands for him! Unfortunately, not the first time something like that's happened, I assure you!). In prior videos I shared the process of sculpting and painting him in-depth and in this most recent one, I sew his clothes and show-off a bit of the staged set that went into making the finished dimensional illustration.


Watch Brambling | Making a Fantasy Art Doll


I enjoy characters with fanciful clothing and while the brambling's clothes are meant to have a utilitarian, rustic look to them, I was able to add some visual interest with the fae creature's asymmetrical, tattered cloak. The clothing was distressed by wrinkling, staining with acrylic paint, sanding, and then hand-sewing the fabric directly on to the art doll's body. I usually make a point of distressing an art doll's fabric as i like the viewer to imagine the secret life that the art doll has when they're not around. A life with a bit of mystery and magic's a better one! Lastly I set-up the scene by arranging fabric, vines, butterflies, and even used some small tree stumps! I photographed this mixture of found objects and then spent a little time post-producing the image in Photoshop.


Here's the finished dimensional-illustration:

You can find a print of this illustration here: https://www.etsy.com/listing/601530840/brambling-fey-fantasy-fine-art-85x11?ref=listings_manager_grid

You can find a print of this illustration here: https://www.etsy.com/listing/601530840/brambling-fey-fantasy-fine-art-85x11?ref=listings_manager_grid


I hope you enjoyed exploring this magical fey creature as much as I have! To be the first to know when I launch new polymer clay art videos, be sure to subscribe to my YouTube channel and hit the bell icon (but because YouTube's wonky, you can also join the newsletter). Catch all of my videos here:  https://www.youtube.com/thedreamsyndicatearts. You can also find many of the supplies I use in crafting here: https://www.thedreamsyndarts.com/supplies-gear/. Until next time, make believe!
Painting the Brambling | Painting a Fantasy Creature Head

Now that the brambling's head is sculpted to my liking, it's time to lay down some paint! When painting a fantasy creature head, it's actually kind of important to ground yourself in realism because bramblings are elusive in the wild! I had to do the next best thing and bring a couple of tree branches into the studio. Who'd have thought realism's the best strategy when painting a fantasy creature head? By looking at this tree branch I could observe that it was largely a warm grey tone with moments of green and brown on it rather than that iconic brown Crayola crayon that we might all instantly imagine.


Watch the Brambling Head Be Painted with Acrylics Here


I used a range of earth-tones in painting the fey creature's head- siennas, umbers, ochers, and greens with touches of grey tones to dull-down the pigments. I also painted the head generally lighter than I would have naturally due to the fact that I was about to embark on trying my hand with an ink wash technique...

EXPERIMENTING WITH INK!

ACRYLIC INK

In painting this head, I tried a technique that was new to me: using an acrylic ink wash with dark toned ink. I had carved a lot of bark texture all over the brambling and I wanted a way to darken the recessed areas that didn't involve my painstakingly painting in dark tones and then carefully trying not to undo this work as I painted-in lighter tones. Before I used the technique on the actual fantasy art doll head, I tested on scrap sculpted piece I had (who'd have thought I was doing myself a favor when I accidentally sculpted two right hands for this art doll?!). Admittedly, I still feel like I can do a better job at highlighting sculpted details with this technique, but overall, I'm happy with the outcome.


If you would like a print of the Brambling final image, you can purchase it HERE.


I hope you enjoyed exploring this magical fey creature as much as I have! To be the first to know when I launch new polymer clay art videos, be sure to subscribe to my YouTube channel and hit the bell icon (but because YouTube's wonky, you can also join the newsletter). Catch all of my videos here:  https://www.youtube.com/thedreamsyndicatearts. You can also find many of the supplies I use in crafting here: https://www.thedreamsyndarts.com/supplies-gear/. Until next time, make believe!

MAKING A ST. GEORGE ART DOLL ⚔🐉

In this part of the process of making a St. George art doll, the poseable doll's made from a variety of mixed media. Most of the materials your as likely to find in a hardware store as you are an art supply or hobby shop. The armature consists of twisted aluminum wire, aluminum tubing in the neck and used at the forearms, a length of steel wire to give the figure stability and allow it to anchor into a set or display base, and plumber's epoxy. The body's massed-out with upholstery foam and then clothing's sewn around the art doll.


Watch Part 5 in the St. George & the Dragon Piece | MAKING A ST.  GEORGE ART DOLL ⚔🐉:


An art doll's neck doesn't need to be reinforced with the aluminum tubing, you can typically just drill right into the clay if you'd like, but the way I design my characters, I like them to have thin necks because that's the way I tend to draw figures- I like lanky, gawky, attenuated characters. If I were to make a character's neck as thin as I do without putting in the tubing and drill into it, the backed polymer clay would likely crack and crumble around the drill bit.


Once the aluminum and steel wire are all twisted into place, they're secured with plumber's epoxy that's molded into a form to create a cylinder shaped chest and smaller oblong cylinder for the pelvis, which all takes about an hour to set (if you were handling the plumber's epoxy more vigorously, you might want to give it a day). From there, I use the figure's contours to sketch-out a front and back form out of the upholstery foam and cut it out with pair of scissors. These front and back pieces get attached to the plumber's epoxy with a resin based epoxy. Lastly I sketch-out the amount of fabric I'll need to sew the clothing, leaving a bit of a seam allowance. Ordinarily, it's a good idea to use lighter weight fabric, but for the look of the chain-mail armor, I used a heavier upholstery weight fabric that was kind of a pain to work with. The process of making St. George art doll probably took a couple of full work days, not including the time I spent sketching-out details or gathering materials.


If you want to make the imaginary a reality, be sure to subscriber on YouTube!

If you want to be the first to know when I launch new polymer clay art videos, be sure to subscribe to my YouTube channel and hit the bell icon (but because YouTube's wonky, you can also join the newsletter). At present, I am launching new videos Saturdays at 2pm EST and I will keep this information up-to-date on my YouTube channel's banner and "about" section here:  https://www.youtube.com/thedreamsyndicatearts.

Sculpting St. George 🐉

When sculpting St. George, I wanted a younger interpretation of our hero. Just about every time I'm sculpting an art doll, I begin with sketches and for this piece I did a few quick studies from teenage aged boys- some of the reference pictures came from Google image searches and some from this great book of Norman Rockwell's depictions of childhood. I also spent spent some time looking at prior depictions of St. George in medieval and renaissance art.

Watch Part 4 in the St. George & the Dragon Piece | Sculpting St. George 🐉:


I wanted to capture a sort of frightened, panicked expression and I was somewhat thinking of Kevin McCallister from "Home Alone", you know, the shaving cream, "Aaahhhhhhhhhh!" scene. My idea for the finished piece of art is to create an image that references the legend of St. George and the Dragon, but to also convey the concept that the dragon isn't nearly as threatening as George thought and it was his imagination making the dragon more terrible than he thought.


If you want to make the imaginary a reality, be sure to subscriber on YouTube!

If you want to be the first to know when I launch new polymer clay art videos, be sure to subscribe to my YouTube channel and hit the bell icon (but because YouTube's wonky, you can also join the newsletter). At present, I am launching new videos Saturdays at 2pm EST and I will keep this information up-to-date on my YouTube channel's banner and "about" section here:  https://www.youtube.com/thedreamsyndicatearts.